Be Patient. Order in process.
Please do not click back or reload the page. Call 1 (800) 891-8312 with any questions.
FREE SHIPPING*Most orders over $500 qualify. Free shipping applies to Barn Door Hardware, Barn Doors, and Pocket Doors over $500. Front doors, interior doors, shower doors, any oversized door (wider than 3ft and taller than 7ft) and any special order doors have shipping costs which are calculated at checkout. Some barn door hardware track lengths do not qualify for free shipping.
The world's most trusted source for designer doors & hardware

2 Panel Barn Door Installation Instructions

The 2 Panel is one of the iconic Barn Doors that is timeless, and will make almost any space better. Download Instructions PDF for the 2 Panel Barn Door are also available.

2 Panel Barn Door Instructions & Video

2 Panel Barn Door Recommended Tools
  • Drill with Phillips Bit
  • Socket Wrench with 7/16" Socket
  • Rubber Mallet
  • Adjustable Square

2 Panel Barn Door Parts
  • Side Stile Left (1)
  • Side Stile Right (1)
  • Bottom Rail (1)
  • Center Rail (1)
  • Top Rail (1)
  • Lower Left Side Slat (1)
  • Lower Middle Slats (6*)
  • Lower Right Side Slat (1)
  • Upper Left Side Slat (1)
  • Upper Middle Slats (6*)
  • Upper Right Side Slat (1)
  • 6in Lag Screws (8*)

2 Panel Assembly Instructions & Video

First Things First

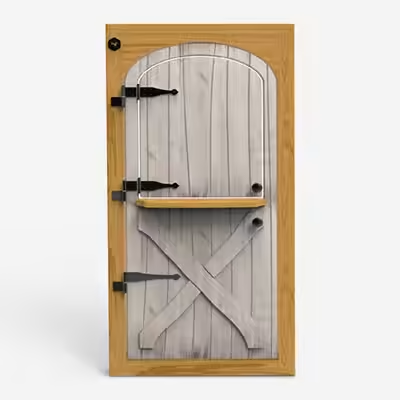
Lay out all wood parts before beginning assembly to ensure parts have not been damaged in shipping. damage has occurred, call 800-891-8312 and Rustica Hardware will expedite a replacement.

Note: This door model comes in various sizes. The instructions have been written for the single door size; but larger doors may have more wood and fastener parts.

Note: Always alternate the direction of the wood grain when assembling slats. This will add to the assembly and help prevent warpage.

Note: Doors using Floor Mount Door Guides have a groove on the bottom edge. Ensure this groove is on the bottom when the door.

2 Panel Barn Door Assembly Instructions

By Definition: Tongue and Groove refers to the ridge extending beyond the main portion of slat or stile. Groove refers to the slot cut into the other side of slat or stile.

Note: The following should be a ‘dry’ assembly. Do use adhesives in when putting this door

Step 1: Using a rubber mallet, gently tap the lower rail (A2) into the bottom of the right stile rail (A1R) . Attach the bottom rail to the side stile using a socket wrench with a 7/16” socket and two lag screws (D) (Figure 1).

2 panel barn door install step 1

Suggestion: Use an adjustable or fixed carpenter’s square to ensure all sides of the door are square to each

Step 2: Beginning with the lower right side slat (B3) slide the lower slats (B2) with the tongue facing to the right, into the groove of the bottom rail one at a time, ending with the lower left side slat (B1). Tap each in place with the rubber mallet (Figure 2).

2 panel barn door install step 2

Step 3: Slide the center rail (A3) lower groove over the top of the lower slats. Tap with a rubber mallet into the right side stile. Attach the middle rail to the right sitle rail using a socket wrench with a 7/16” socket and one lag screw (D) (Figure 3).

2 panel barn door install step 3

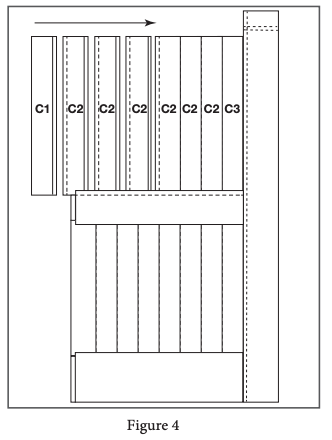
Step 4: Beginning with the upper right side slat (C3) slide the upper slats (C2) into the groove of the center rail (A3) one at a time, ending with the upper left side slat (C1). Tap each in place with the rubber mallet (Figure 4).

2 panel barn door install step 4

Step 5: Slide the top rail (A4) lower groove over the top of the upper slats. Tap with a rubber mallet into the right side rail. Attach the upper rail to the right side stile using a socket wrench with a 7/16” socket and one lag screw (D) (Figure 5).

2 panel barn door install step 5

Step 6: Carefully align the left side stile (A1L) to the top, middle, and bottom rails and the top and bottom slats. Gently tap in place with a rubber mallet. Attach to the to the top, middle, and bottom rails using a socket wrench with a 7/16” socket and the remaining 4 lag screws (D) (Figure 6).

2 panel barn door install step 6
Hi {{storage.distributor.name}} Discounts Applied · Logout
Hide
Wish List
My Wishlist
Hide
Sample Room
My Sample Room
BOM
{{part.name}}
TEST MODE
{{part.price | myCurrency}}
Remainder
{{part.quantity}}
{{attribute.name}}
{{attribute.value}}
ui.bom
ui.productOptions.assignments
ui.inputs